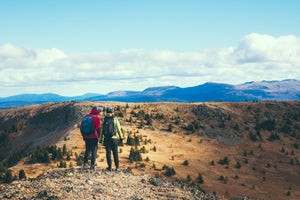
This fall, Race Face athletes Wade Simmons and Celeste Pomerantz headed into the southern BC wilderness for a different kind of Pick-A-Part. Rather than look at any particular skills or trail tactics, Wade and Celeste reach into their bikepacking toolboxes for what to bring, what bikes (and components) work best for your trip and most importantly, how to maximize bikepacking fun.
Looking for even more insight on how to plan, pack and execute your next bikepacking trip? Wade and Celeste were nice enough to share some of their experience with us in this handy Q&A.
What are the steps you typically follow when planning a bikepacking trip?
The great thing about bikepacking is the variety of options! Whether it’s a one-night trip close to home, or a multi-day epic adventure, the fact that you are riding your bike with camping gear and sleeping outside is awesome. Once you know where you want to explore, it all comes down to what it’s going to take to make that happen. Everything flows after that; logistics, gear, time, etc.
-
Decide how many days you want to spend on your trip. Knowing the number of days you plan to spend on the bike will help determine route planning, packing list, food choices, and will even drive decisions around which bike to bring. Longer trips will be better suited for trusty short-travel hardtails, Trail or Cross-Country bikes. One or two-night trips might allow for longer-travel enduro rigs.
-
Know what you are setting out to do. This helps ensure everyone has the most fun possible. Are you after some high-alpine freeriding with a luxurious base camp, or opting for a longer and lightweight traverse? This will guide decision-making about packing extras like protection for bigger lines, or sticking to a minimalist kit for longer days in the saddle. Distance and elevation are key things to discuss.
-
Plan your route. It’s best to start with some established routes in familiar terrain – stick to environments you’re used to, and the riding will be most familiar. A handy internet search of “MTB bike packing routes” alongside your location is a great place to start.
-
Understand best practices.
A. Once you know where you’re going, learn about the area and ensure you respect the route! Your route might pass through a park where riding lines off-trail is frowned upon, while another might offer more “choose your own adventure” style terrain.
B. Unless facilities exist along your route, you should plan to pack in everything you pack out. Just like hiking, bikepacking should be approached with a “leave no trace” mentality. Only footsteps and tire treads.
C. If there’s a chance of wildlife along your route, know and understand how to react to animals, and ensure you bring appropriate equipment to protect yourself (and the animals).
-
Get the gear. Consider the amount of time you’ll be spending, what you’ve got at your disposal to carry supplies, the environment you’ll be in, and your trip intentions. See a packing list later in the article. Don’t forget to consult your group and share gear where suitable! This helps avoid everyone carrying extra and unnecessary weight.
-
Practice. Riding with the additional pack or frame bags, setting up/tearing down camp, adjusting your bike for time spent with and without gear.
-
Get a tune up. It’s always good to ensure your shifting, brakes and suspension are all functioning properly prior to heading out on a trip.
-
Learn basic bike maintenance. Knowing how to change a flat, plug a puncture, fix a broken chain, and replace a shifter cable can get you out of a tough spot when you’re out on a trip.
- Tell a friend, and have a plan if things go awry. At least one reliable person should know where you’re going, when you intend to be back, and be prepared to check in on you if they don’t hear from you by an agreed-upon time. Set expectations for when that friend should contact authorities to ensure your safety – e.g. Four hours after agreed-upon check-in time.

What’s on your packing list?
We love this list from Bikepacking.com and would advise you review that list. With that said, we’ve included some extras (and personal favourites) we’d suggest bringing along for the ride.
Celeste’s Full Kit
“Depending on the trip, I can fit my supplies and gear into a 27 or 37L backpack!”
|
- Bike |
- Coffee |
- Mini-Pump |
|
|
- Helmet |
- Electrolytes |
- Tire Levers |
|
|
- Gloves |
- Small Camp Stove |
- Hand Sanitizer |
|
|
- Sunglasses |
- Fuel |
- Portable Charger |
- Toilet Paper |
|
- Sunscreen |
- Lighter |
- Camera |
- Heli Straps |
|
- Toothbrush |
- Small Saw |
- Bowl |
|
|
- Sleeping Bag |
- Water Filter |
- First Aid Kit |
- Mug |
|
- Sleeping Pad |
- Headlamp |
- Bike Parts |
- Spork |
|
- Tent |
- Base Layers |
- Multitool |
- Satellite Messenger |
|
- Food/Snacks |
- Puffy Jacket |
- Bike Gear/ |
- Dry Bag (food storage) + Rope to hang |
Riding protection – if you’re planning to go “Freeride bikepacking” like we did around Trapper Lake, ensure to bring a low-bulk kit of protection for sending. Knee pads, elbow pads and gloves will help keep the vibes high even if spills happen. We suggest pads from the Indy or Covert lines.
Wade’s Additional Items
- Bolstered medical supplies... Especially when someone in your group is managing a chronic condition, be sure they bring adequate medical supplies to sustain for the trip (on top of a regular first aid kit), then keep extra in a separate place just in case!
- Snacks... There’s never enough! A combination of sweets like gummies or cola bottles, and some fat/protein like nuts and cheese... you can never go wrong with a Swiss mountain cheese like Gruyere or Emmentaler.
- Hot Sauce... Cholula is the favourite, to spice things up.
Celeste’s Bonus Item
Frame snack bag! Keep your energy up by consuming food in small amounts during long pedals, not just before and after.

What adjustments to your bike setup helped with your trip?
It’s important to avoid making too many changes to your cockpit setup before a trip – if it ain’t broke, don’t fix it. It’s better to consider things that will be impacted by the demands of bikepacking which differ from traditional rides. For example:
- Bike packing often entails a lot of pedaling. If your bike has adjustable geometry, consider putting your bike in a more pedal-friendly position. Wade made this tweak with his Rocky Mountain Slayer’s Ride 4 Geo adjustment. A steeper seat tube and steer tube angle can help with pedaling efficiency.
- Consider tire pressure. You plus your gear weighs a lot more with all your bikepacking supplies, so be sure to pump up tire pressure to ensure optimal pedaling efficiency (without sacrificing tire traction). Try bumping up your go-to PSI by 5 or 10. Don’t forget to drop your pressure again for any days in the saddle unencumbered.
- Set your sag. Similar logic here as tire pressure. We suggest packing your bag beforehand and hitting the trails with the sag range recommended by your suspension manufacturer. Be sure to bring a shock pump with you so you can make any adjustments for peak-bagging or freeride days along the way. If running a coil shock, crank up your spring preload to ensure you’re not sitting too deep in your shock travel.
- Tilt your saddle. Dropping the nose of your saddle down a bit can ease the time spent pedaling, and it’s an easy thing to readjust when you get home. Be sure to use a torque wrench.
- Which components? For longer distance rides with more wear and tear, and lots of hiking, consider switching out some of your components.
- Flat pedals can be great when consistently hopping on and off the bike..
- Aluminum handlebars will stand up better to wear imparted by handlebar bags over long distances (and lots of rubbing). Carbon is great if you’ve got protective wrap in the right spots.
- An aluminum wheelset can be a durable go-to if riding in rough terrain.
Most of these adjustments are quick enough that you can get your bike back into ‘send it’ mode within 10 minutes of taking off your pack.
What tips do you have for those ascending and descending off established trails?
Set your objectives and understand them early. If you’re heading off-grid for some freeride bikepacking like we did, it can help to set your objectives early. Use tools like FATMAP to scope out areas, see terrain, and understand elevation gains for your planned objectives.
“From experience, I can say you move way slower than expected when travelling off-trail, so consider that when planning a destination.”— Wade
Be flexible. Come up with a loose plan, and as you approach an objective, be prepared to adjust your plan. If your find your objective isn’t what you expected, be flexible and go for something different and more approachable. Things always look different up close!
“Efficient travel through the backcountry only comes with experience, and it’s quite possible that the lines you choose are not rideable. If that happens, just have a look around, and revel in the fact that no human has ever been here with a bike before.” — Wade
Expect route-finding. Study your objective from a distance and decide on a plan early. There are many ways to a summit, and those ascents start at different points. Pick gradual grades with limited foliage to avoid getting off your bike too often.
“I quite enjoy the route-finding involved when attempting a planned destination off trail – that’s half the fun! It’s a great feeling, to know that you may be the first group of people to ever hike bikes up a drainage, ridge, or peak... how cool is that!” — Wade

Use colour and texture to understand terrain. We can understand lots about the surfaces we intend to ride based on their colour and texture. Small undulations and grey areas might seem approachable from far away, but can quickly turn into unrideable boulder fields as you approach them. Stick to dirt-colored terrain where possible, and consider that varying colour likely means foliage, which can be hard to navigate on a bike.
Don’t be afraid to get off and push (or carry). Sometime riding can prove more difficult than hike-a-biking. If things get steep or a little uneven, don’t be afraid to hike up and ride down.
Before you drop into a line, study it and pick your route. Know your stopping points (best to stop in sight of riding partners), look for obstacles to avoid along the way, and don’t go too big out of the gate.
Ride cautiously. Riding un-built terrain is very different, so don’t ride at your normal pace. Often it’s a long way back to civilization, and if anything goes wrong, a rescue could take hours.
Keep your weight back and eyes up. On terrain covered with a soft layer of grass or dirt, going over the bars can happen easier than normal. Keep your weight back until you get a feel for the terrain, then shift into a more typical riding position. Constantly look ahead – scan for bumps, dips or rocks that could disrupt your line and avoid them.
Don’t overcommit. Pick objectives cautiously, and be conscious of what’s required with your ascents, descents, and climbs back out. Riding into a gully is rad, but only if you’ve got the energy to pedal back up.
“I can’t stress enough. When freeriding in remote terrain, consider how your choices may affect the group. An accident can mean extraction, so I try to ride 100% within my abilities, and focus on avoiding mistakes that may affect the group. This means maintaining a functioning bike and body.” — Wade
Look for natural features to enhance the line. Look for natural booters, rolling doubles, and gullies – once you’re confident on the terrain, natural features that seem unassuming can help you get a little sendy.
